
In the Card Management menu you can perform a variety of actions regarding the Cards you've collected through Story Mode or through the Gacha by accessing 4 different sections.
1. Formation[]
This section allows you to customize your party of characters that will be playable during Missions, as well as equip them. Your party consists of three different characters. The character in the middle is the one that you'll play as the moment a mission start.

You can put different characters in your party by drag-and-dropping them from the bottom section of the screen. You can also do the same in reverse to remove characters from your party. You can also swap characters in your party.

You can customize a maximum of 5 parties. In order to select a different party, tap on the blue arrows at the top-left and at the top-right of the screen.
In this section they can be seen surrounded by colored rings. These show the bond that there is between the characters in your party. If you tap on the rings of a character, the stat-boosts and special effects of that character that derive from said bond will be displayed.If you tap on the charcter's model, the girl will hold her weapon and a small menu will appear.

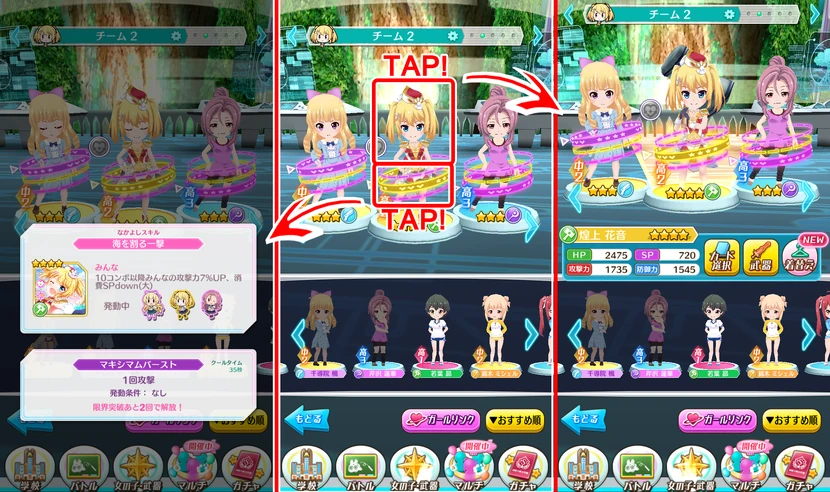
The small menu shows the type of weapon equipped, the number of stars of the character's card, her stats and contains three icons that, if tapped, lead to other submenus.
[]
The icons lead respectively to the card-equipping menu, the weapon-equipping menu and the wardrobe.


[]


[]
The card-equipping menu allows you to pair the cards from your collection to your characters, making them stronger and letting them gain new abilities to use during missions.
You can equip 1 Main Card and 3 Sub Cards. The Main Card needs to belong to the same character you're equipping it to. However, you can equipped whatever character's card in whatever character's sub-slots. You must first unlock sub-slots, in order to use them. You unlock each when the character reaches her affection level of 10, 20 and 40. When you equip a Sub-Card, you can view the influences to the character's stats next to the Main-Card, as well as check the new abilities gained by tapping the small blue icon at the top-right of the screen.
You can equip cards by drag-and-dropping them from the list below to the slots above. Small icons with characters' heads and either the text Main or Sub may be on the top-right corner of cards icons. That means that that card is already equipped in that character's Main-slot or Sub-slot. You can't equip cards that are already equipped as Main-Cards by another character. You can, however equip other already Sub-equipped cards, but the game will first ask you if you're sure you want to remove the card from the chracter who already has it equipped.
You can also filter the card list by tapping on the yellow button at the bottom of the menu with two reverting arrows. You can either display all cards for the character you selected, all cards that come with a specific weapon type, or all cards in general.
[]


[]
In the weapon-equipping menu you can you equip chracters with the weapons you collected or crafted to use during missions. To equip a weapon you must simply tap on the icon of the weapon you want to equip. If a weapon is already equipped by another character, you'll be asked if you're sure to remove the weapon from the character that has already equipped it. In this screen you can view (from the top-left) the Attack Power (in red) of the weapon selected, its level, and a bar showing its speed.
Weapons can have 3 types of speed:
- slow (red): you can perform only 1 attack at a time;
- medium (yellow): you can perform 2 attacks at a time;
- fast (blue): you can perform 3 attacks at a time.
The bar can be entirely filled by one color, or contain 2 different colors, or all 3. The amount of bar filled by one color indicates how often you'll be experiencing that speed in battle.
The yellow button at the bottom of the menu leads you to the Weapon management menu.


Wardrobe[]
The wardrobe allows you to dress your characters with the outfits you've collected by obtaining cards or accomplishing objectives.
In order to change clothes you must drag-and-drop the outfit from the menu at the bottom of the screen to the girl's drawing.
If you dress a character with the same outfit she wears in her main card, she'll gain a stat-boost.
.
.
.
.
.
.
.
2. Card Collection[]


This section allows you to check all the cards that you've collected. You can view each card stats, images, weapon types, as well as unclock the maximum level cap beyond level 50 and change them from Stars-cards to Hearts-cards. By tapping on a card's icons, all information about that card will appear on screen.


The stats of the card are displayed below the card's image. In the top-left corner of the screen is displayed the number of stars of the card.
Depending on the card, on the top-right corner of the screen a play button may be placed. If you tap on it, a dialog sequence unique to that card will start playing.
If you tap on the card's image you can view the image without its frame.


If you tap on the blue arrow to pointing to the right of the stats, you can view the special attacks and abilities that the card grants to the user.


At the bottom of the screen are 4 buttons. Here are explanation of what they're used for from left to right:

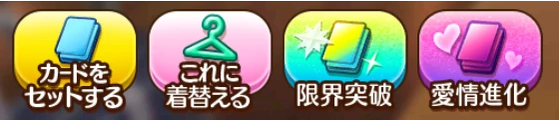
-The first button leads to the card's character's card-equipping menu;
-The second button allows you to dress the character with the dress displayed in the selected card. You'll be asked if you're sure you want to change outfit;
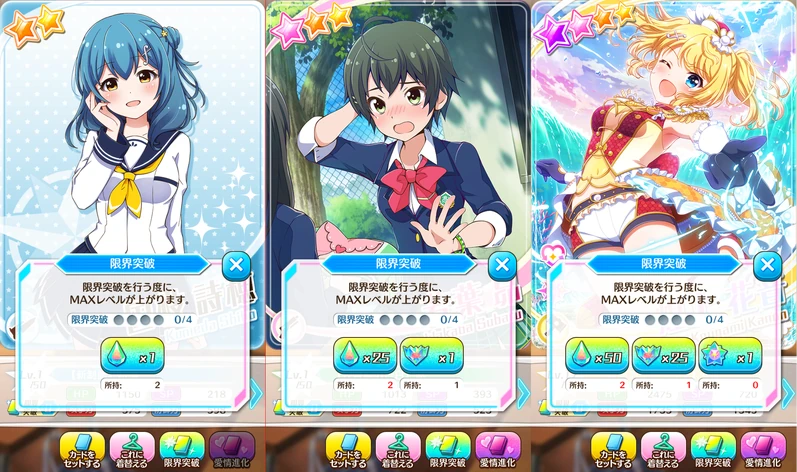
Expanding a card's maximum level cap.[]
The third icon allows you to unlock the maximum level cap of the card to beyond level 50. In order to do so, a number of duplicate-shards need to be spent. These shards can be obtained by collecting duplicates of card from the Gacha.
There are 3 types of duplicate-shards, that differ from the amount of stars that the duplicated card had. Depending on the number of stars that the card you want to unlock its maximum level cap has, you'll need more and higher-stars duplicate-shards. For example, a 2-stars card only needs one 2-stars duplicate-shard. With 3-stars and 4-stars cards you can decide wich type of duplicate-shards to use.
You can maximize the level cap of a card up to 4 times. Each time you do, the level cap will raise up 5 levels.


Obtaining a hearts-card.[]
The last button is only available for 3-stars and 4-stars cards, It allows you to change a card from a stars-card to a heart-card.
This also unlocks a special mission only playable with the character equipped with the hearts-card you obtained. In order to this, you must first fill the number of hearts corrisponding to the number of stars the card has by either letting the girl train in the school yard or simply clearing missions. Only then the pink button in this screen will become usable.
You'll also be asked to pay an amount of Cheer Points before completing the procedure.
.
.
.
.
.
.
3. Card Trading[]


This section allows you to trade three 4-stars cards from your collection with one 4-stars card that you can choose from a pre-made list of cards.
Simply tap the blue card slots and drag-and-drop the cards that you want to trade in them. You can also trade in duplicate-shards that came from 4-stars cards.
The list of cards that you can obtain through trading is pre-set. There are about three or four different cards per character, except fro Shiho and Kanon.
Once you selected the cards that you want to trade and the one that you want to obtain, tap on the pink button in the bottom-right of the screen to complete the procedure.
.
.
.
.
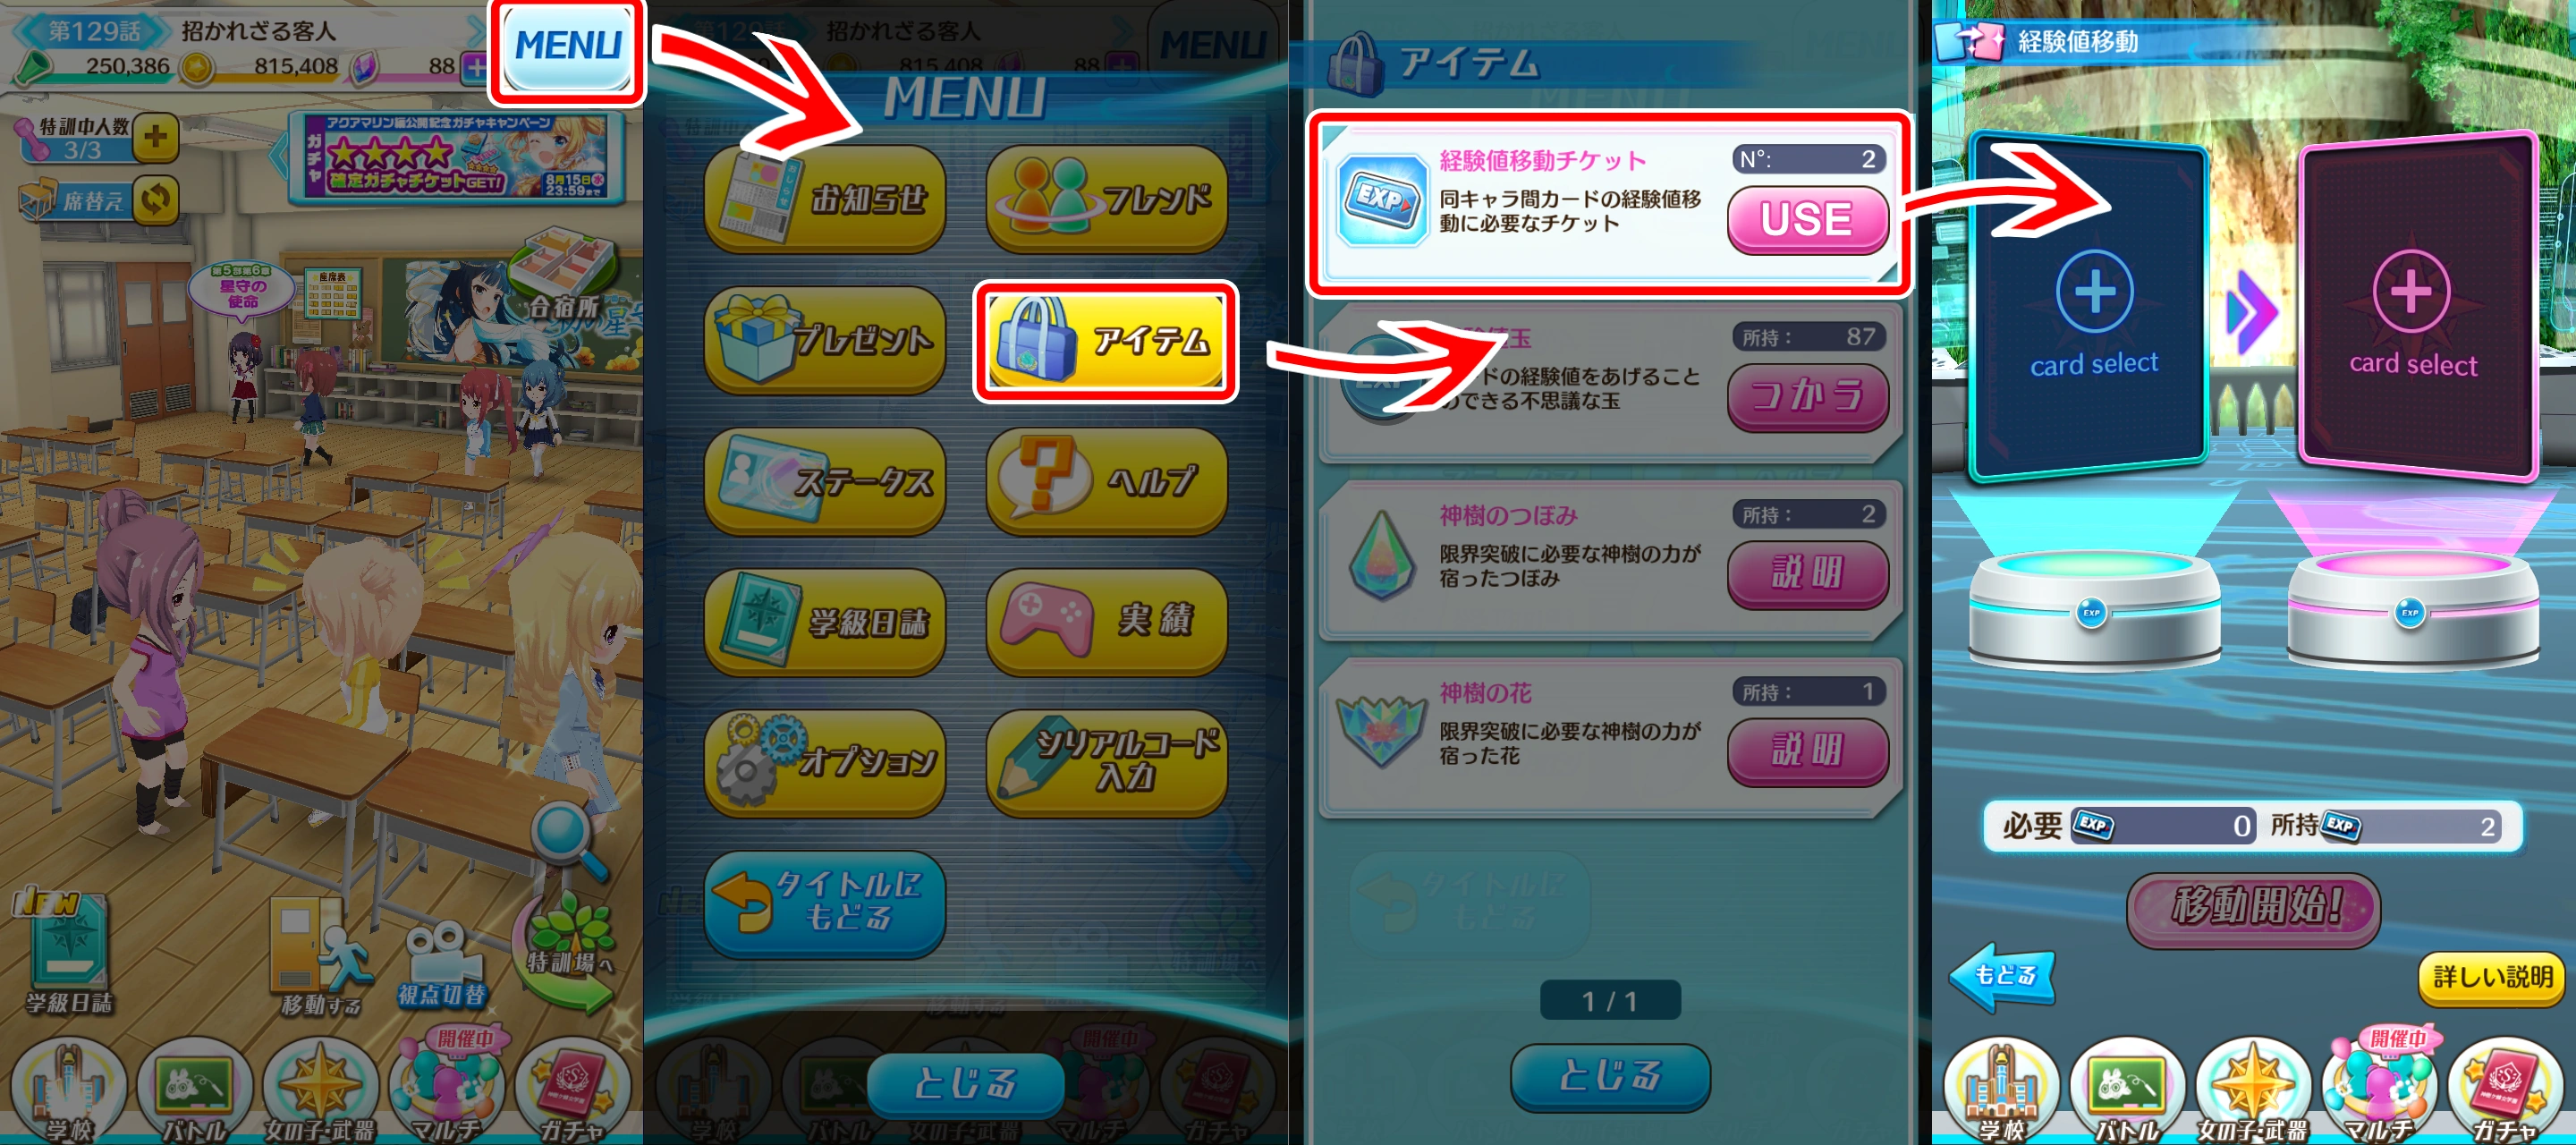
4. EXP Transfer[]


In this section you can transfer experience points from one card to another card that belong to the same character using EXP Tickets.
EXP Tickets are a type of item obtainable in various ways, for example, as a reward for completing Objectives in some Missions. The amount of EXP Tickets you have collected can be reviewed in your Bag.
You can also access this screen by selecting EXP Tickets from your Bag. You can access your Bag from the main menus by simply tapping the MENU button and then tapping the button with a bag icon. From there you can read the number of EXP Tickets and by clicking on the pink button, you'll be sent on this screen.

.
.
.
.
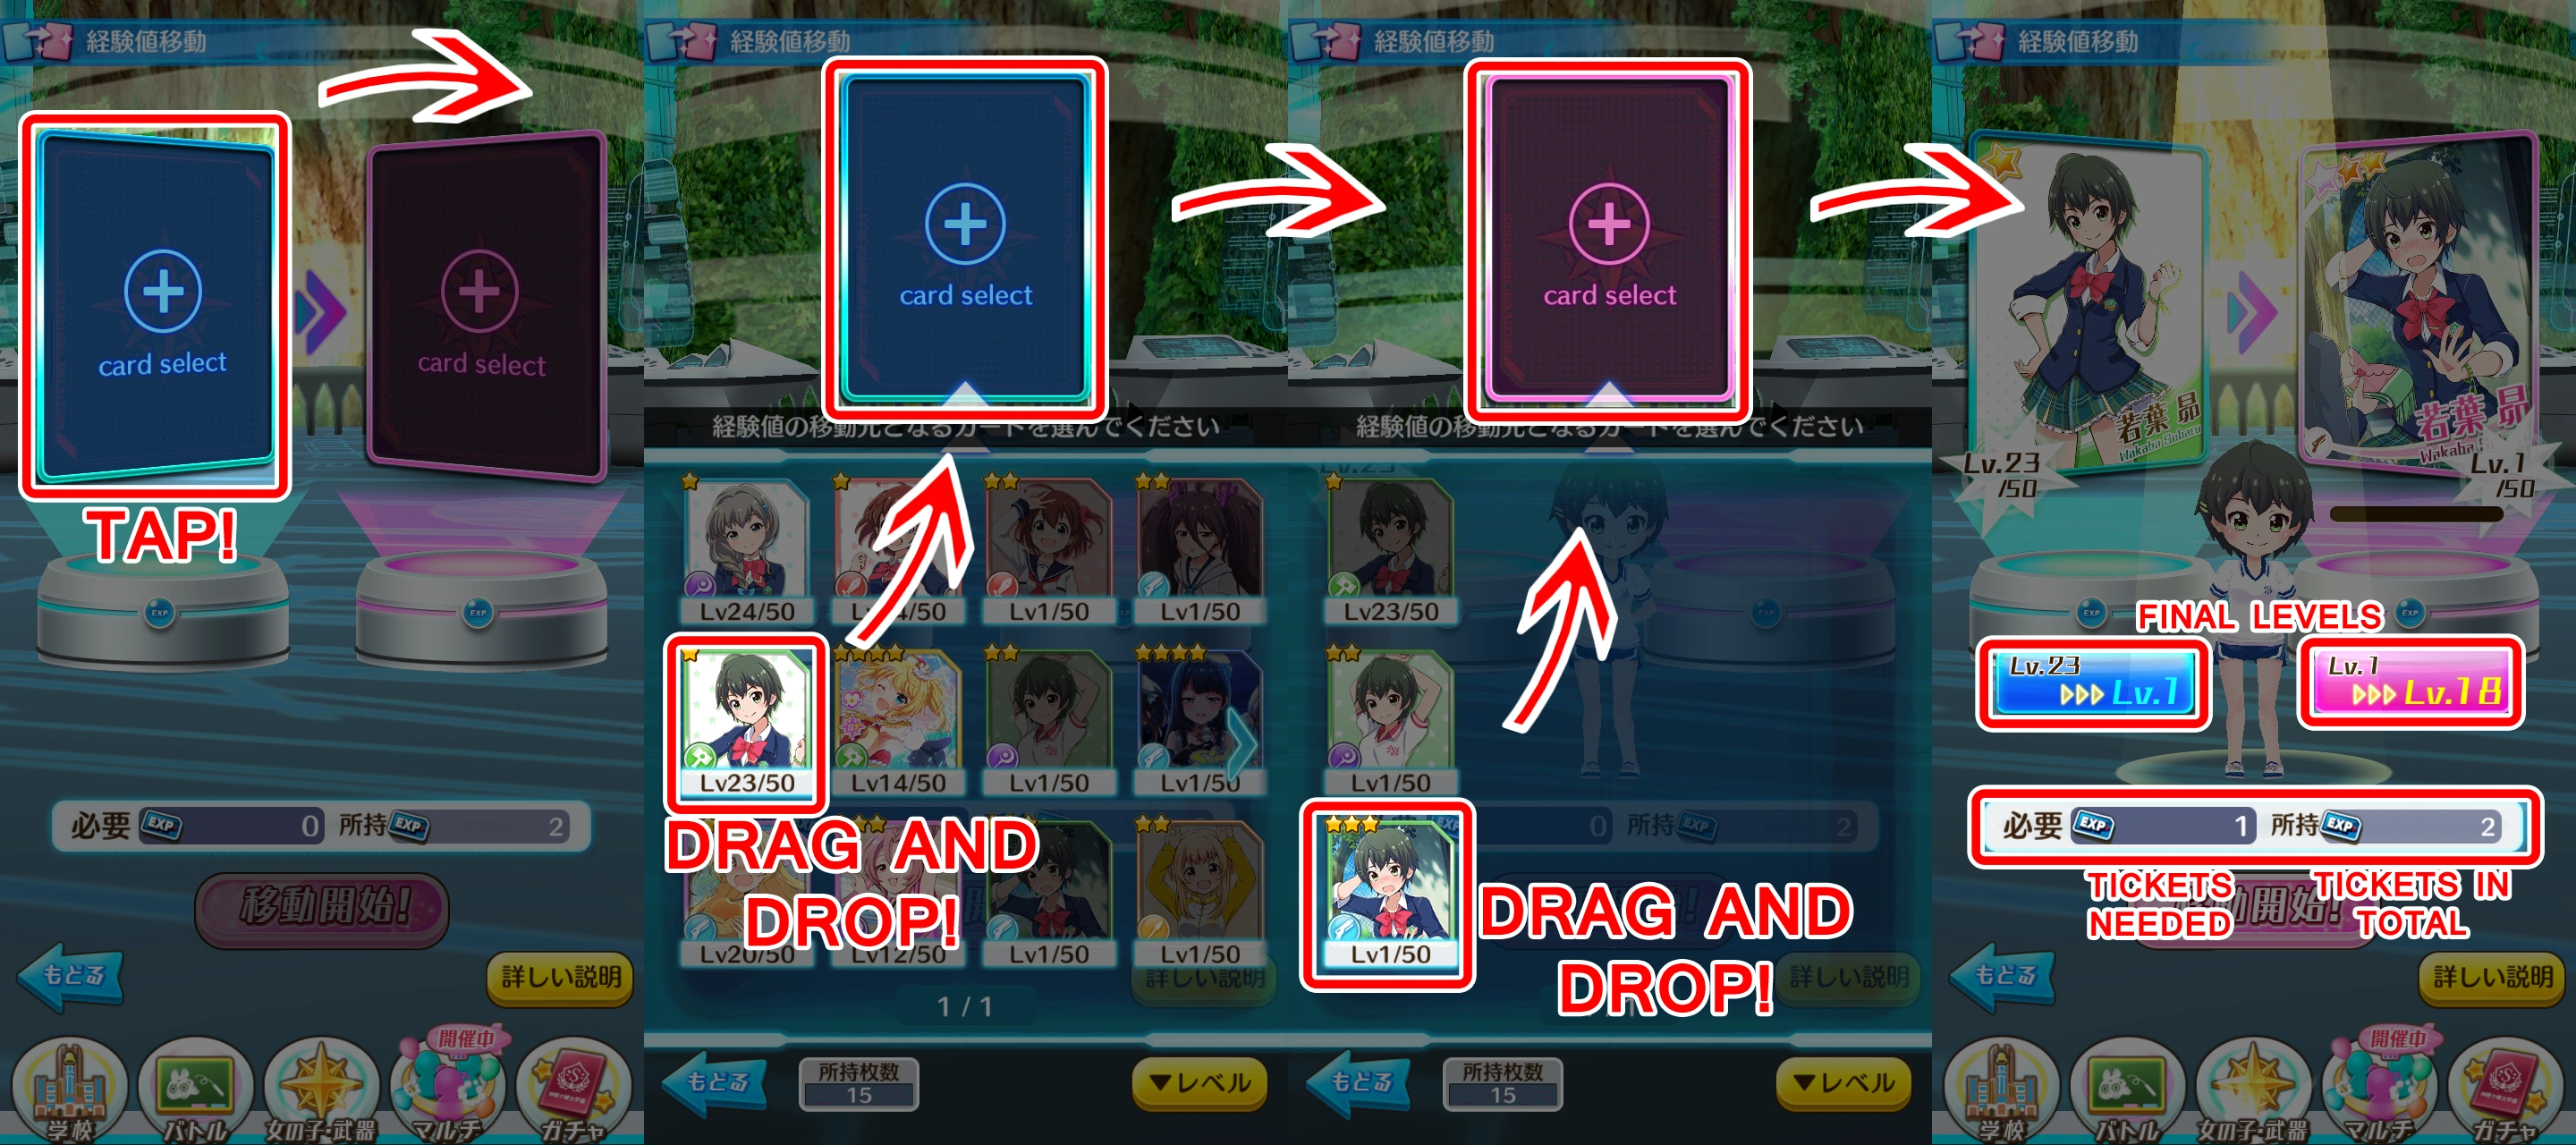
If it's the first time you access this screen, you'll be presented with an explanation on how EXP Tickets work.
EXP Tickets are used to transfer the amount of EXP gained by a card into a different card of the same character that has an equal or higher amount of stars. By the end of this process, the card that gave out the EXP will be reverted back to Level 1.
Be warned that the receiving card won't necessarily rise to the same level of the card that gave the EXP. That's because cards with a higher number of stars need more EXP to level up.
In order to prepare the cards for EXP transfer, you must first select either the card you want the EXP to be transfered from or the card that you want the EXP to be transfered to. Once you selected either of those, the other card slot will only show the cards for the character you chose and highlight only the cards that can be used to complete the process.

5. Weapon Management[]

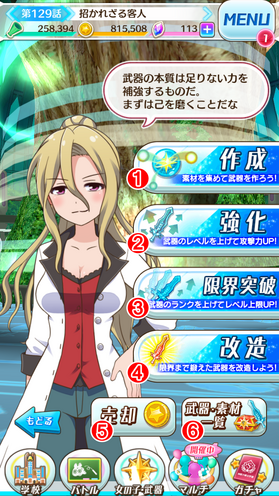
From this screen you can perform various actions regarding wapons, such as create weapons or sell them.
There are 6 different submenus, each allow you to perform different actions:
- 1: create a weapon;
- 2: level-up a weapon;
- 3: ???
- 4: ???
- 5: sell weapons;
- 6: check item collection.
.
.
.
.
.
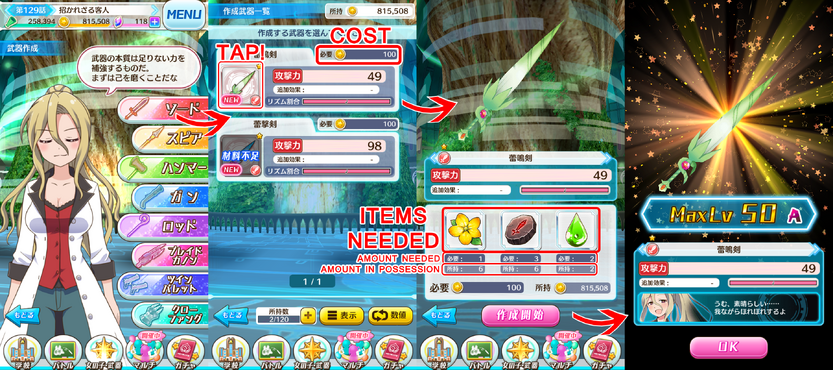
1: Creating a weapon.[]
Creating weapons is very simple. First choose the type of the weapon you want to create. Then choose between the list of different weapons you can create (the list can be expanded by progressing through Story Mode). Then see if you have all the items required for its creation, and finally, by pressing the pink button to complete the creation.
Once a weapon is created it receives a grade which influences the maximum level cap of the wapon. Grades go from S to E.
Remember that weapons also cost money to create.

2: Leveling-up a weapon.[]
To level-up a weapon you must first select the weapon you want to level-up, then select the items and the relative amount of items you want to spend in order to level up the weapon. Some items may level up weapons more than other items, so it's best to see which one works best first. To complete the procedure, simply tap on the pink button.


5: Selling weapons.[]


Here is where you can sell your weapons. Under each weapon's icon is displayed the relative price. You can select multiple weapons at once by simply tapping on them. The total amount of money you'll get after selling your weapons is display under the weapon list. Press the pink button below the weapon list to complete the transaction.
.
.
.
.
.
.
.
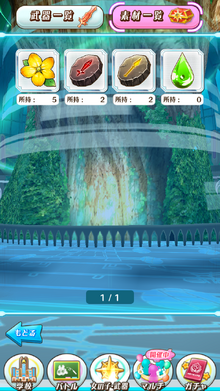
6: Inventory.[]


Here you can check the amount of items you collected and which weapons you obtained or crafted.
You can view your items by tapping the button on the top-right corner of the screen.
You can view your weapons by tapping the button on the top-left corner of the screen.